> ## Documentation Index
> Fetch the complete documentation index at: https://support.myapps.ai/llms.txt
> Use this file to discover all available pages before exploring further.
# ObjectCraft
> Generate stunning 3D models from text or images with advanced AI technology.
# ObjectCraft: AI-Powered 3D Model Generation Powered by Meshy
Transform your ideas into stunning 3D models using cutting-edge AI technology with ObjectCraft, powered by Meshy API!
## Overview
ObjectCraft is a powerful AI-driven tool leveraging the **Meshy API** to generate 3D models. It offers multiple input methods: creating models from text descriptions (**Text to 3D**), converting single images into 3D (**Image to 3D**), and generating models from multiple images (**Multi Image to 3D**). ObjectCraft provides detailed controls and post-processing options like **Remesh** to refine your generated models.
Generate intricate 3D models from detailed text descriptions.
Transform single 2D images into fully-realized 3D models.
Generate 3D models from multiple images of an object.
## Understanding 3D Model Generation Basics
For users new to 3D model generation, here are a few fundamental concepts:
* **Topology:** Refers to the arrangement of vertices, edges, and faces that make up a 3D model's surface. Common types are **Triangle** (simpler, often used in real-time graphics) and **Quad** (preferred for animation and smooth surfaces).
* **Polycount:** The total number of polygons (usually triangles or quads) in a model. A **High Target Polycount** results in more detail but larger file sizes, while a **Low Target Polycount** simplifies the model.
* **Texturing:** Applying images to the surface of a 3D model to give it color, detail, and material properties. **Textured Mesh** means the generated model will come with these surface images.
## How to Use ObjectCraft
ObjectCraft offers three primary modes, selectable via the dropdown menu at the top.
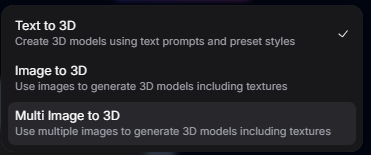 Select the generation mode from the dropdown menu: **Text to 3D**, **Image to 3D**, or **Multi Image to 3D**.
* For **Text to 3D**: Enter a text prompt describing your desired 3D model.
* For **Image to 3D**: Upload a single image file.
* For **Multi Image to 3D**: Upload multiple image files (up to 4).
Configure the available parameters based on your selected mode (see Input Parameters section below).
Click the **Generate** button. The AI will process your input and settings to create your 3D model.
### Text to 3D Mode
Generate a 3D model from a text description.
Select the generation mode from the dropdown menu: **Text to 3D**, **Image to 3D**, or **Multi Image to 3D**.
* For **Text to 3D**: Enter a text prompt describing your desired 3D model.
* For **Image to 3D**: Upload a single image file.
* For **Multi Image to 3D**: Upload multiple image files (up to 4).
Configure the available parameters based on your selected mode (see Input Parameters section below).
Click the **Generate** button. The AI will process your input and settings to create your 3D model.
### Text to 3D Mode
Generate a 3D model from a text description.
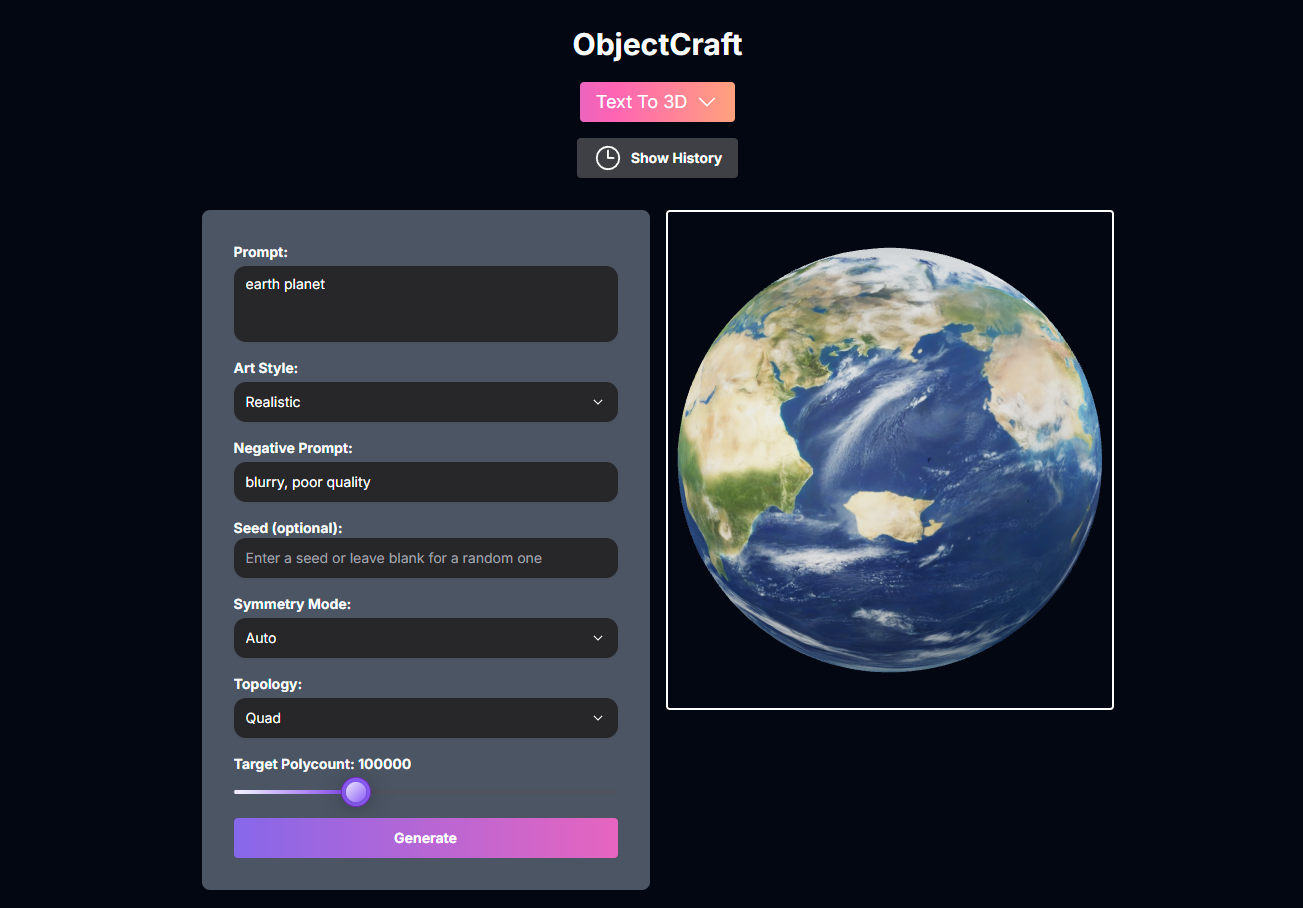 Choose **Text to 3D** from the mode dropdown.
Enter a **Prompt** describing the model. You can also add a **Negative Prompt** to exclude elements.
Configure **Art Style**, **Seed (optional)**, **Symmetry Mode**, **Topology**, and **Target Polycount**.
Click **Generate**.
### Image to 3D Mode
Generate a 3D model from a single image.
Choose **Text to 3D** from the mode dropdown.
Enter a **Prompt** describing the model. You can also add a **Negative Prompt** to exclude elements.
Configure **Art Style**, **Seed (optional)**, **Symmetry Mode**, **Topology**, and **Target Polycount**.
Click **Generate**.
### Image to 3D Mode
Generate a 3D model from a single image.
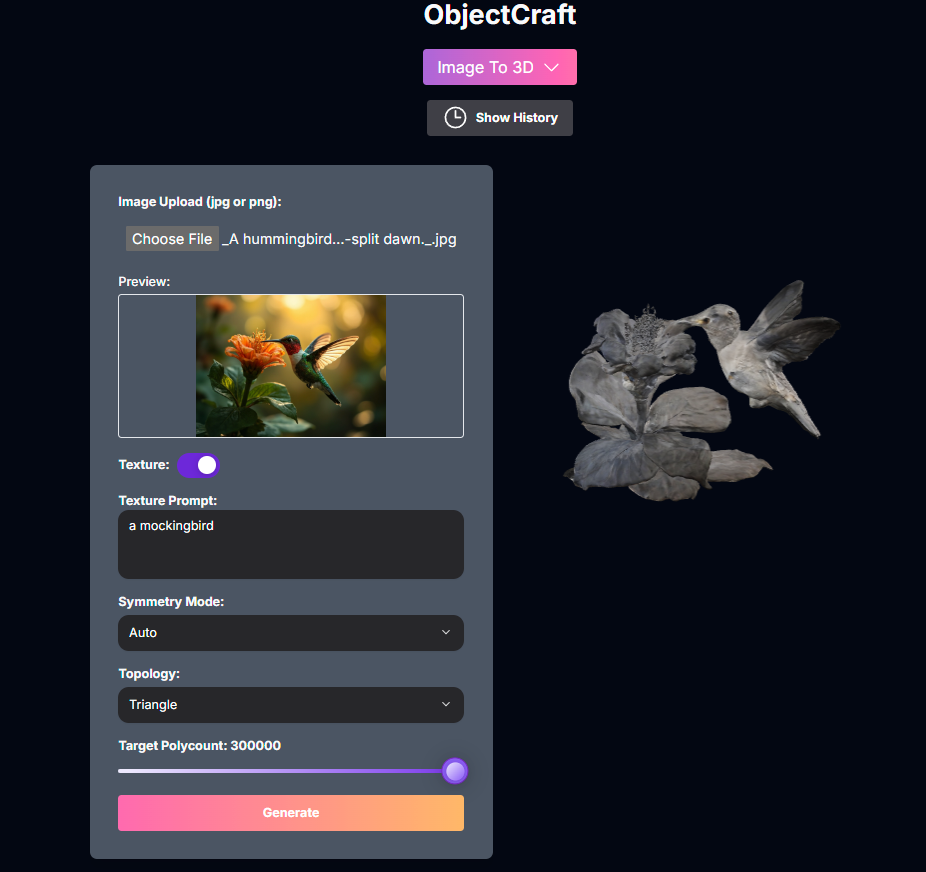 Choose **Image to 3D** from the mode dropdown.
Upload your image file (JPG or PNG).
Configure **Texture**, **Texture Prompt (optional)**, **Symmetry Mode**, **Topology**, and **Target Polycount**.
Click **Generate**.
### Multi Image to 3D Mode
Generate a 3D model from multiple images (up to 4).
Choose **Image to 3D** from the mode dropdown.
Upload your image file (JPG or PNG).
Configure **Texture**, **Texture Prompt (optional)**, **Symmetry Mode**, **Topology**, and **Target Polycount**.
Click **Generate**.
### Multi Image to 3D Mode
Generate a 3D model from multiple images (up to 4).
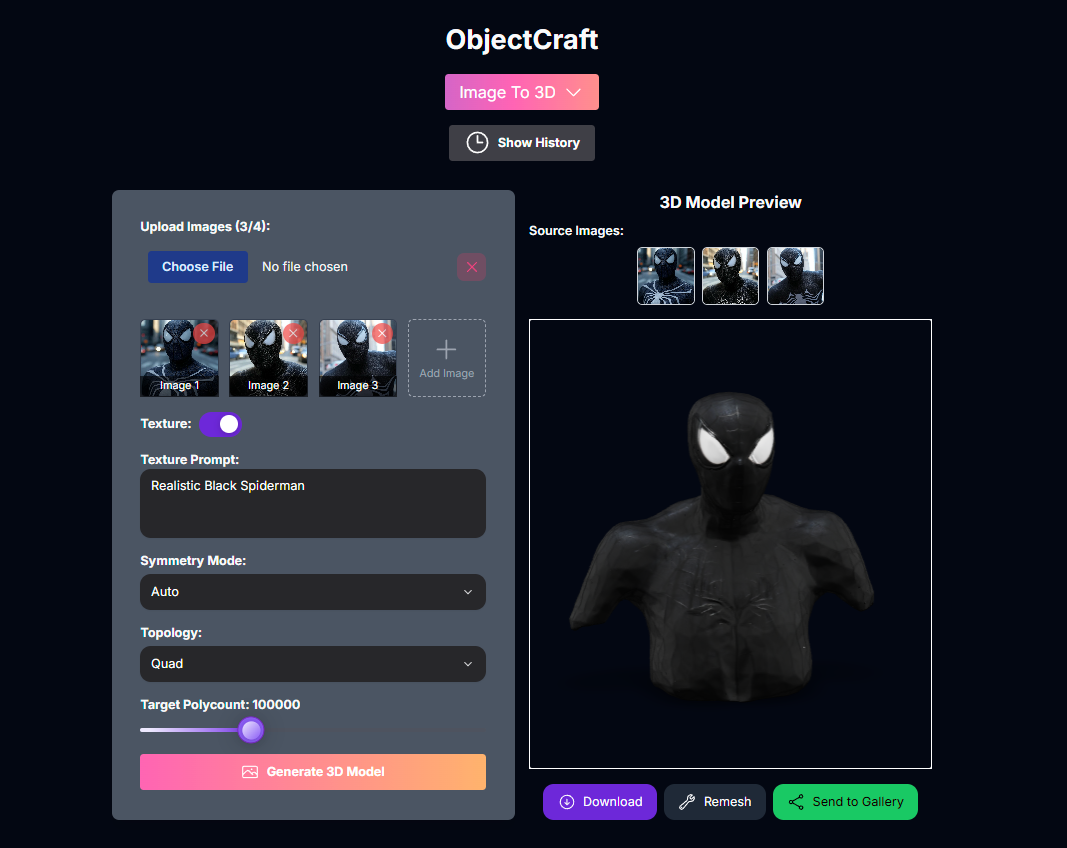 Choose **Multi Image to 3D** from the mode dropdown.
Upload 2 to 4 image files (JPG or PNG) of the object from different angles.
Configure **Texture**, **Texture Prompt (optional)**, **Symmetry Mode**, **Topology**, and **Target Polycount**.
Click **Generate**.
## Input Parameters and Options
The available parameters in ObjectCraft depend on the selected **Select Type**:
(Text to 3D) Text description of the desired 3D model.
(Text to 3D) Choose the artistic style: `realistic`, `sculpture`.
(Text to 3D) Text description for elements to avoid.
(Text to 3D) Enter a seed for reproducible results.
(Image to 3D & Multi Image to 3D) Upload 1 image (Image to 3D) or up to 4 images (Multi Image to 3D). JPG or PNG.
(Image to 3D & Multi Image to 3D) Toggle to generate the model with textures.
(Image to 3D & Multi Image to 3D) (Optional) Describe the desired texture.
(All Modes) Control symmetry: `off`, `auto`, `on`.
(All Modes) Choose mesh topology: `triangle`, `quad`.
(All Modes) Desired complexity of the model. Range: 10000-300000.
## Mastering ObjectCraft Prompts (Text to 3D)
Crafting effective prompts is crucial for achieving the best results with ObjectCraft's Text to 3D mode.
### The Importance of Prompting
Your **Prompt** tells the AI what to create, while the **Negative Prompt** tells it what to avoid. Using both effectively helps guide the AI towards your desired outcome and away from unwanted results (e.g., "blurry, poor quality").
### Key Prompt Elements & Settings
Clearly describe the object, style, and details.
Specify elements or qualities to exclude (e.g., "low poly", "untextured").
Choose between **Realistic** (for lifelike models) and **Sculpture** (for a more stylized, artistic look).
Use a specific seed for model consistency across generations.
Control symmetry: **Off** (no symmetry), **On** (enforce symmetry), **Auto** (AI decides).
Choose between **Triangle** (simpler mesh) and **Quad** (more complex, often better for animation).
Set the desired detail level. **Low Target Polycount** creates simpler models, while **High Target Polycount** creates more detailed ones.
## Generated Models / History
ObjectCraft keeps a history of your generated 3D models.
Choose **Multi Image to 3D** from the mode dropdown.
Upload 2 to 4 image files (JPG or PNG) of the object from different angles.
Configure **Texture**, **Texture Prompt (optional)**, **Symmetry Mode**, **Topology**, and **Target Polycount**.
Click **Generate**.
## Input Parameters and Options
The available parameters in ObjectCraft depend on the selected **Select Type**:
(Text to 3D) Text description of the desired 3D model.
(Text to 3D) Choose the artistic style: `realistic`, `sculpture`.
(Text to 3D) Text description for elements to avoid.
(Text to 3D) Enter a seed for reproducible results.
(Image to 3D & Multi Image to 3D) Upload 1 image (Image to 3D) or up to 4 images (Multi Image to 3D). JPG or PNG.
(Image to 3D & Multi Image to 3D) Toggle to generate the model with textures.
(Image to 3D & Multi Image to 3D) (Optional) Describe the desired texture.
(All Modes) Control symmetry: `off`, `auto`, `on`.
(All Modes) Choose mesh topology: `triangle`, `quad`.
(All Modes) Desired complexity of the model. Range: 10000-300000.
## Mastering ObjectCraft Prompts (Text to 3D)
Crafting effective prompts is crucial for achieving the best results with ObjectCraft's Text to 3D mode.
### The Importance of Prompting
Your **Prompt** tells the AI what to create, while the **Negative Prompt** tells it what to avoid. Using both effectively helps guide the AI towards your desired outcome and away from unwanted results (e.g., "blurry, poor quality").
### Key Prompt Elements & Settings
Clearly describe the object, style, and details.
Specify elements or qualities to exclude (e.g., "low poly", "untextured").
Choose between **Realistic** (for lifelike models) and **Sculpture** (for a more stylized, artistic look).
Use a specific seed for model consistency across generations.
Control symmetry: **Off** (no symmetry), **On** (enforce symmetry), **Auto** (AI decides).
Choose between **Triangle** (simpler mesh) and **Quad** (more complex, often better for animation).
Set the desired detail level. **Low Target Polycount** creates simpler models, while **High Target Polycount** creates more detailed ones.
## Generated Models / History
ObjectCraft keeps a history of your generated 3D models.
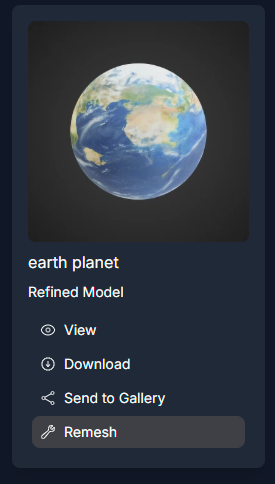 Click the **Show History** button to open the history sidebar on the left.
See a list of your previously generated models with thumbnails.
Select a model from the history to view it in the 3D viewer.
Download individual models in various formats or all formats as a ZIP.
Click the **Show History** button to open the history sidebar on the left.
See a list of your previously generated models with thumbnails.
Select a model from the history to view it in the 3D viewer.
Download individual models in various formats or all formats as a ZIP.
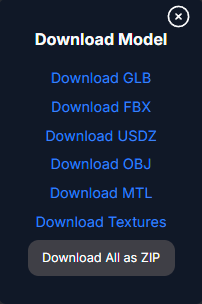 Remesh a generated model to change its format, topology, polycount, origin, or height.
Share your generated model to a community gallery.
Clear all generated models from your history.
## Remesh Model
The Remesh feature allows you to modify the properties of a generated 3D model, such as its format, topology, polycount, origin, and height.
Remesh a generated model to change its format, topology, polycount, origin, or height.
Share your generated model to a community gallery.
Clear all generated models from your history.
## Remesh Model
The Remesh feature allows you to modify the properties of a generated 3D model, such as its format, topology, polycount, origin, and height.
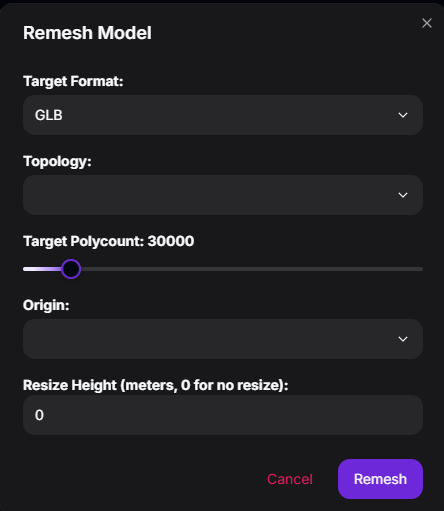 From the history sidebar, click the **Remesh** option under a generated model. This will open the Remesh Model modal.
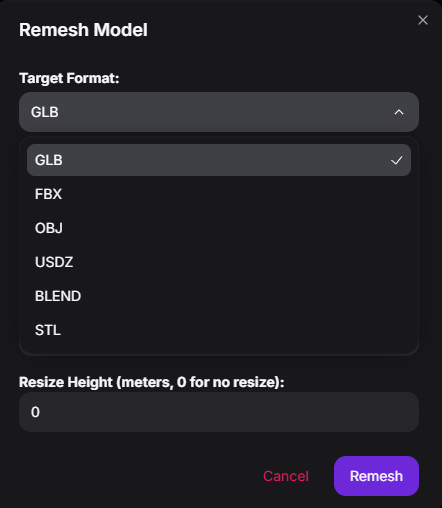 Configure the remeshing parameters in the modal:
* **Target Format**: Choose the output file format (GLB, FBX, OBJ, USDZ, BLEND, STL).
Configure the remeshing parameters in the modal:
* **Target Format**: Choose the output file format (GLB, FBX, OBJ, USDZ, BLEND, STL).
 * **Topology**: Select the mesh structure (Triangle or Quad).
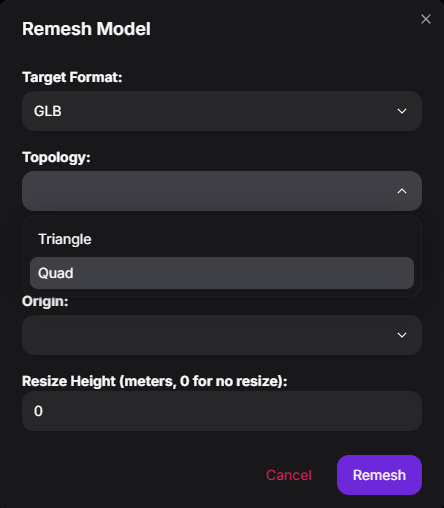 * **Target Polycount**: Set the desired complexity using the slider.
* **Origin**: Choose the model's origin point (Bottom or Center).
* **Target Polycount**: Set the desired complexity using the slider.
* **Origin**: Choose the model's origin point (Bottom or Center).
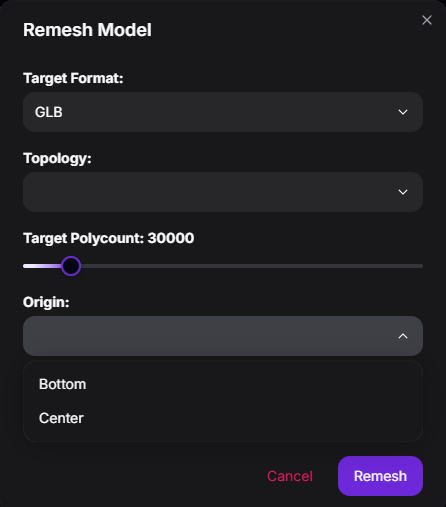 * **Resize Height**: Enter a value to resize the model's height in meters (0 for no resize).
Click the **Remesh** button in the modal. The AI will process the model with the new settings.
### Remesh Parameters:
The desired output file format for the remeshed model: `GLB`, `FBX`, `OBJ`, `USDZ`, `BLEND`, `STL`.
The desired mesh structure: `Triangle` or `Quad`.
The desired complexity of the remeshed model. Range: 100-300000.
The desired origin point: `Bottom` or `Center`.
Set a specific height in meters (0 to keep original height).
## Tips for Best Results
Provide clear and specific text descriptions or high-quality images for better results. For Multi Image to 3D, ensure images cover different angles well.
Try all three modes (Text, Image, Multi Image) to see which works best for your concept.
Experiment with settings like Topology, Target Polycount, and Symmetry Mode to refine the mesh.
Utilize the Remesh feature to optimize models for specific use cases or software.
## Troubleshooting
If you encounter issues with ObjectCraft, consider these solutions:
Refine your text prompts or use higher-quality input images. Adjust generation settings like Target Polycount.
Check your inputs for any unusual characters or overly complex descriptions. Ensure image files are valid and within limits.
Ensure the original model was generated successfully. Check the parameters in the Remesh modal for valid inputs.
## Conclusion
ObjectCraft provides a powerful and intuitive way to generate 3D models using AI, whether starting from text or images. With its flexible input types, detailed settings, and post-processing tools like Remesh, it empowers you to create and refine 3D assets for various applications.
* **Resize Height**: Enter a value to resize the model's height in meters (0 for no resize).
Click the **Remesh** button in the modal. The AI will process the model with the new settings.
### Remesh Parameters:
The desired output file format for the remeshed model: `GLB`, `FBX`, `OBJ`, `USDZ`, `BLEND`, `STL`.
The desired mesh structure: `Triangle` or `Quad`.
The desired complexity of the remeshed model. Range: 100-300000.
The desired origin point: `Bottom` or `Center`.
Set a specific height in meters (0 to keep original height).
## Tips for Best Results
Provide clear and specific text descriptions or high-quality images for better results. For Multi Image to 3D, ensure images cover different angles well.
Try all three modes (Text, Image, Multi Image) to see which works best for your concept.
Experiment with settings like Topology, Target Polycount, and Symmetry Mode to refine the mesh.
Utilize the Remesh feature to optimize models for specific use cases or software.
## Troubleshooting
If you encounter issues with ObjectCraft, consider these solutions:
Refine your text prompts or use higher-quality input images. Adjust generation settings like Target Polycount.
Check your inputs for any unusual characters or overly complex descriptions. Ensure image files are valid and within limits.
Ensure the original model was generated successfully. Check the parameters in the Remesh modal for valid inputs.
## Conclusion
ObjectCraft provides a powerful and intuitive way to generate 3D models using AI, whether starting from text or images. With its flexible input types, detailed settings, and post-processing tools like Remesh, it empowers you to create and refine 3D assets for various applications.