> ## Documentation Index
> Fetch the complete documentation index at: https://support.myapps.ai/llms.txt
> Use this file to discover all available pages before exploring further.
# FluxCraft Unlimited
> Explore advanced AI image generation with multiple models and comprehensive tools
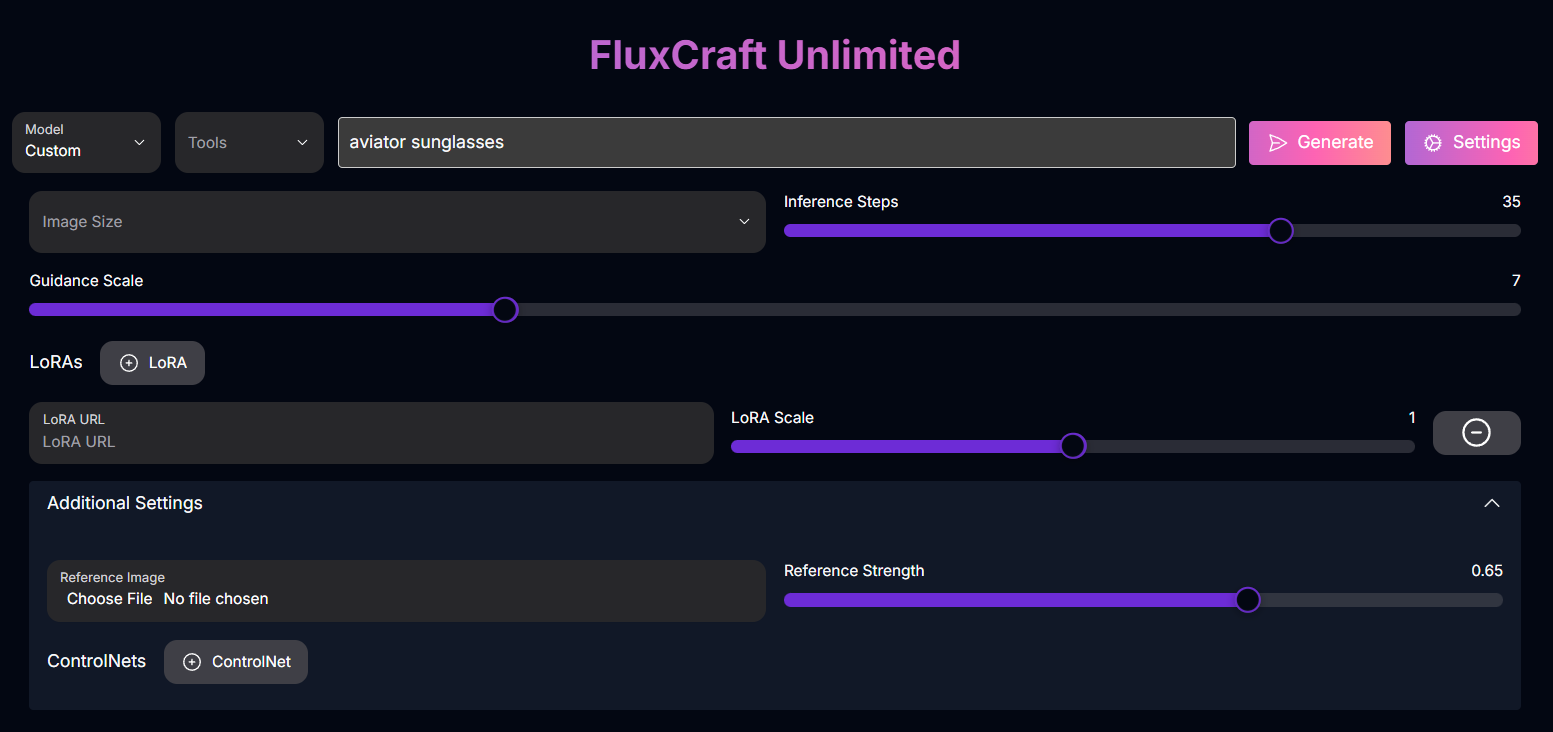 # FluxCraft Unlimited: Unleash the Full Spectrum of AI Image Creation
Dive into the ultimate AI image generation experience with FluxCraft Unlimited! Access a diverse range of models, powerful tools, and unparalleled customization to bring your most ambitious visual concepts to life.
## Overview
FluxCraft Unlimited is the premier platform for advanced AI image generation, offering a comprehensive suite of tools and models tailored for creators who demand flexibility, control, and high-quality outputs. It moves beyond basic prompting, providing access to different **Flux models**, each with its own set of capabilities and specialized tools. From rapid generation to intricate editing and the power to blend concepts using **LoRAs, ControlNets, and reference images**, FluxCraft Unlimited provides the most complete Flux experience available.
Explore a range of **specialized AI models**, each with unique strengths and tools.
Access tools for **generating, remixing, editing, and controlling** image creation.
Leverage **LoRAs, ControlNets, and reference images** for unparalleled control and blending.
Generate visuals with **exceptional detail, consistency, and artistic fidelity**.
## Models and Their Tools
FluxCraft Unlimited offers access to various Flux models, each equipped with a specific set of tools to cater to different creative workflows. The available tools change depending on the selected model:
Optimized for **speed**.
* **Available Tools:** Generate, Redux
A versatile development model.
* **Available Tools:** Regular, Image to Image, Redux
Designed for **professional-grade outputs**, offering various control methods.
* **Available Tools:** Regular, Redux, Canny, Depth, Fill
* *Note:* For **Fill** tool, mask drawing and image uploading are available.
An updated version of the Pro model.
* **Available Tools:** Regular, Redux
Focuses on **style consistency**.
* **Available Tools:** Regular, Redux
* *Note:* Includes a **Raw option** for enhanced style consistency.
Specialized for generating **realistic images**.
* **Available Tools:** Regular
A highly **customizable version of Flux Dev**, offering the most complete toolset.
* **Available Tools:** Differential Diffusion, Image to Image, Inpainting, RF-Inversion
* *Note:* This model allows the addition of **ControlNets** and **Reference Images**, and the **Inpainting** tool includes mask drawing and image uploading.
Specialized for generating images based on a **subject image input**.
* **Available Tools:** Regular
* *Note:* Requires a **Subject Image** upload.
### Understanding the Tools:
* **Generate / Regular:** Create images from a text prompt.
* **Redux:** Remix or modify existing images based on a prompt and an input image.
* **Image to Image:** Transform an input image based on a prompt and its visual content.
* **Canny:** Use Canny edge detection from an input image to guide generation (Pro 1.).
* **Depth:** Use depth map from an input image to guide generation (Pro 1.).
* **Fill / Inpainting:** Modify specific masked areas of an image based on a prompt and an input image with a mask (Pro 1., Custom).
* **Differential Diffusion:** (Custom) Likely related to applying changes based on a change map image.
* **RF-Inversion:** (Custom) Likely related to inverting or extracting information from an image with advanced controls.
## Mastering Prompts for FluxCraft Unlimited
Prompting in FluxCraft Unlimited is a dynamic process that adapts to the model and tool you choose. While some models excel with simple descriptions, others unlock their full potential with detailed, structured prompts and the integration of visual references.
### General Prompting Principles:
Whether generating from scratch or editing, clear and detailed prompts yield better results. Describe subjects, actions, settings, styles, and mood.
Your prompt's interpretation is heavily influenced by the selected tool. A prompt for "Generate" will be interpreted differently than the same prompt used with "Fill" or "Redux".
Flux models generally respond well to natural language sentences rather than just keywords.
While not all models fully support them, using negative prompts can help steer the AI away from unwanted elements or artifacts.
### Prompting for Specific Tools/Features:
Focus on describing the desired final image. Include details about composition, lighting, style, and subject matter.
*Example:* "A cinematic shot of a lone astronaut standing on a rocky alien planet under two moons, wide angle, dramatic lighting."
Describe the desired changes or the new style you want to apply to the input image.
*Example:* (Input: Photo of a dog) Prompt: "Turn this dog into a cyberpunk robot, neon lights, wires, futuristic."
Describe the desired output image, and the AI will use the input image as a strong visual guide for composition, color, or style, depending on the model and strength settings.
*Example:* (Input: A sketch of a character) Prompt: "Render this sketch as a detailed fantasy oil painting."
Describe what you want to appear in the masked area. The AI will attempt to generate content that fits the prompt and blends with the unmasked parts of the image.
*Example:* (Mask over a blank wall) Prompt: "Add a vibrant mural of a dragon breathing fire."
Include the LoRA's specific **trigger word** in your prompt. Then, describe the scene or subject you want, incorporating the concept or style the LoRA was trained on.
*Example:* (Using a "fantasy creature" LoRA with trigger "mythicbeast") Prompt: "A majestic **mythicbeast** perched on a cliff overlooking a misty valley."
Your prompt describes the *content* and *style* of the image, while the ControlNet image provides the *structure* or *composition*. Ensure your prompt aligns with the structural guide provided by the ControlNet image.
*Example:* (ControlNet: Canny edges of a building) Prompt: "A beautiful watercolor painting of an ancient castle at sunset." (The AI will generate a watercolor painting of a castle following the edge structure of your input image).
Describe the desired image, indicating how the AI should draw inspiration from the reference image(s). You can reference specific images if using multiple.
*Example:* (Reference Image 1: A character, Reference Image 2: A scene) Prompt: "Generate a portrait of the person from image1 standing in the setting from image2."
### Prompt Examples
Here are some examples showcasing prompting for different scenarios:
A sprawling futuristic city at night, illuminated by neon lights and flying vehicles. High angle view, digital painting, vibrant colors, moody atmosphere.
(Input Image: Photo of a cat) Prompt: "Turn this photo into a stained glass window, vibrant colors, intricate patterns, glowing light."
(Input Image: Room with empty table, Mask over table) Prompt: "Place a steaming cup of coffee and a book on the table."
(Using LoRA with trigger "cyberart") Prompt: "A portrait of a woman in the rain, **cyberart**, neon reflections, detailed face, moody lighting."
(ControlNet Input: Pose of a person) Prompt: "An ancient warrior in battle armor, dynamic pose, fantasy art style, epic lighting."
(Reference 1: Character A, Reference 2: Scene B) Prompt: "Character from image1 exploring the landscape from image2, cinematic lighting, adventurous mood."
## How to Use FluxCraft Unlimited
Embark on your creative journey with this general workflow:
Choose the Flux model that best suits your needs based on its available tools and characteristics (Schnell, Dev, Pro, Ultra, Realism, Custom, Subject).
Choose the specific tool you want to use from the options available for your selected model (e.g., Generate, Redux, Fill, Image to Image).
Enter your text description for the image you want to create or modify. Include trigger words if using LoRAs.
If your selected tool or model requires visual input (Redux, Image to Image, Fill, Inpainting, Custom model with References/ControlNets, Subject model), upload the necessary image(s) or ControlNet files. Draw a mask if using Fill or Inpainting.
Configure common settings like Image Size, Inference Steps, Guidance Scale, and Seed. Adjust model-specific options like LoRA/ControlNet settings, Reference Strength, RF-Inversion controls, or the Ultra model's Raw option.
Click the "Generate" button and await your creation.
Examine the generated image. Iterate by adjusting prompts, settings, or inputs if needed.
## Input Parameters and Options
FluxCraft Unlimited offers a wide array of input parameters to give you precise control over the image generation and modification process. The available parameters vary depending on the selected **Model** and **Tool**.
### Common Parameters (Available across multiple Models/Tools):
Your text description guiding the image creation or modification.
A text prompt specifying elements, styles, or characteristics to avoid in the generated or modified image.
The desired dimensions or aspect ratio for the output image. Can be selected from presets (e.g., `square_hd`, `landscape_16_9`) or specified with custom `width` and `height`. Specific options vary by model.
Controls the detail and refinement of the image generation/modification process. Higher values generally result in more detailed outputs but may increase processing time. (Range typically 3-50).
A number that initializes the random generation process. Using the same seed with the same prompt and settings will produce a consistent result. Enter `-1` or leave empty for a random seed.
Adjusts how closely the AI adheres to your text prompt. Higher values result in outputs that stick more strictly to the prompt, while lower values allow for more creative variation. (Range typically 1-20).
The number of images to generate in a single batch.
The file format for the generated image.
Possible enum values: `png`, `jpeg`
### Model-Specific Parameters:
*Applies to:* **Pro 1.**, **Custom**
A list of LoRA models to apply to the generation.
The URL or ID of the LoRA model.
Controls the strength of the LoRA's influence on the image. (Range typically 0-2).
The specific word or phrase that activates the LoRA's effect in the prompt. (Required when using the LoRA).
The ID of a finetuned version of the LoRA. (Used with finetuned endpoints).
Controls the strength of the finetuned LoRA's influence. (Range typically 0-2).
*Applies to:* **Pro 1.**, **Ultra 1.1** (when using finetuned endpoints)
The ID of the specific finetuned model version to use.
Controls the overall strength of the finetuned model's influence. (Range typically 0-2).
*Applies to:* **Custom**
A list of ControlNet models to apply for structural guidance.
The URL or ID of the ControlNet model.
The configuration URL for the ControlNet model.
The variant of the ControlNet model.
The URL of the image providing structural guidance (e.g., Canny edges, depth map).
The URL of a mask image to apply the ControlNet effect only to masked areas.
Threshold for the mask image. (Range typically 0-1).
Controls the strength of the ControlNet's influence. (Range typically 0-2).
*Applies to:* **Custom**
The URL of a reference image to influence the visual style or content.
Controls the strength of the reference image's influence. (Range typically 0-1).
*Applies to:* **Ultra 1.1**
Toggle for enhanced style consistency.
*Applies to:* **Subject**
The URL of the primary image of the subject for generation.
### Tool-Specific Parameters:
*Applies to:* **Schnell 1.**, **Dev 1.**, **Pro 1.**, **Pro 1.1**, **Ultra 1.1**
The URL of the image to be remixed or modified.
*Applies to:* **Ultra 1.1** Redux
Controls how much the original image influences the result when remixing. (Range typically 0-1).
*Applies to:* **Dev 1.**, **Custom**
The URL of the input image to be transformed.
Controls the strength of the transformation from the original image. (Range typically 0-1).
*Applies to:* **Pro 1.**, **Custom**
The URL of the base image for filling or inpainting.
The URL of the mask image defining the area to be filled or inpainted.
*Applies to:* **Custom** Inpainting
Controls the strength of the inpainting process. (Range typically 0-1).
*Applies to:* **Custom**
The URL of the base image.
The URL of the image defining the desired changes or areas.
Controls the strength of the differential diffusion effect. (Range typically 0-1).
*Applies to:* **Custom**
The URL of the image for RF-Inversion.
Controls the forward pass of the controller. (Range typically 0-1).
Controls the guidance of the controller. (Range typically 0-1).
Start point for reverse guidance. (Range typically 0-1).
End point for reverse guidance. (Range typically 0-1).
Schedule for reverse guidance.
Possible enum values: `constant`, `linear_increase`, `linear_decrease`
*Applies to:* **Pro 1.**
The URL of the image providing the Canny edge or Depth map for guidance.
## How to Use FluxCraft Unlimited
Embark on your creative journey with this general workflow:
Choose the Flux model that best suits your needs based on its available tools and characteristics (Schnell, Dev, Pro, Ultra, Realism, Custom, Subject).
Choose the specific tool you want to use from the options available for your selected model (e.g., Generate, Redux, Fill, Image to Image).
Enter your text description for the image you want to create or modify. Include trigger words if using LoRAs.
If your selected tool or model requires visual input (Redux, Image to Image, Fill, Inpainting, Custom model with References/ControlNets, Subject model), upload the necessary image(s) or ControlNet files. Draw a mask if using Fill or Inpainting.
Configure common settings like Image Size, Inference Steps, Guidance Scale, and Seed. Adjust model-specific options like LoRA/ControlNet settings, Reference Strength, RF-Inversion controls, or the Ultra model's Raw option.
Click the "Generate" button and await your creation.
Examine the generated image. Iterate by adjusting prompts, settings, or inputs if needed.
## Tips for Best Results
Each model and tool combination offers unique capabilities. Experiment to find the best fit for different types of images or tasks.
Invest time in crafting detailed and precise prompts, especially when combining text with visual inputs like LoRAs, ControlNets, or References.
Don't shy away from adjusting the various settings and exploring LoRAs/ControlNets to achieve highly tailored results.
Generate multiple versions with slight variations in settings or prompts to find the optimal outcome.
## Conclusion
FluxCraft Unlimited offers an unparalleled AI image generation experience, providing creators with a powerful array of models, tools, and customization options. Whether you're seeking speed, precision, or the ability to blend complex visual concepts, FluxCraft Unlimited empowers you to push the boundaries of your creative potential.
***
# FluxCraft Unlimited: Unleash the Full Spectrum of AI Image Creation
Dive into the ultimate AI image generation experience with FluxCraft Unlimited! Access a diverse range of models, powerful tools, and unparalleled customization to bring your most ambitious visual concepts to life.
## Overview
FluxCraft Unlimited is the premier platform for advanced AI image generation, offering a comprehensive suite of tools and models tailored for creators who demand flexibility, control, and high-quality outputs. It moves beyond basic prompting, providing access to different **Flux models**, each with its own set of capabilities and specialized tools. From rapid generation to intricate editing and the power to blend concepts using **LoRAs, ControlNets, and reference images**, FluxCraft Unlimited provides the most complete Flux experience available.
Explore a range of **specialized AI models**, each with unique strengths and tools.
Access tools for **generating, remixing, editing, and controlling** image creation.
Leverage **LoRAs, ControlNets, and reference images** for unparalleled control and blending.
Generate visuals with **exceptional detail, consistency, and artistic fidelity**.
## Models and Their Tools
FluxCraft Unlimited offers access to various Flux models, each equipped with a specific set of tools to cater to different creative workflows. The available tools change depending on the selected model:
Optimized for **speed**.
* **Available Tools:** Generate, Redux
A versatile development model.
* **Available Tools:** Regular, Image to Image, Redux
Designed for **professional-grade outputs**, offering various control methods.
* **Available Tools:** Regular, Redux, Canny, Depth, Fill
* *Note:* For **Fill** tool, mask drawing and image uploading are available.
An updated version of the Pro model.
* **Available Tools:** Regular, Redux
Focuses on **style consistency**.
* **Available Tools:** Regular, Redux
* *Note:* Includes a **Raw option** for enhanced style consistency.
Specialized for generating **realistic images**.
* **Available Tools:** Regular
A highly **customizable version of Flux Dev**, offering the most complete toolset.
* **Available Tools:** Differential Diffusion, Image to Image, Inpainting, RF-Inversion
* *Note:* This model allows the addition of **ControlNets** and **Reference Images**, and the **Inpainting** tool includes mask drawing and image uploading.
Specialized for generating images based on a **subject image input**.
* **Available Tools:** Regular
* *Note:* Requires a **Subject Image** upload.
### Understanding the Tools:
* **Generate / Regular:** Create images from a text prompt.
* **Redux:** Remix or modify existing images based on a prompt and an input image.
* **Image to Image:** Transform an input image based on a prompt and its visual content.
* **Canny:** Use Canny edge detection from an input image to guide generation (Pro 1.).
* **Depth:** Use depth map from an input image to guide generation (Pro 1.).
* **Fill / Inpainting:** Modify specific masked areas of an image based on a prompt and an input image with a mask (Pro 1., Custom).
* **Differential Diffusion:** (Custom) Likely related to applying changes based on a change map image.
* **RF-Inversion:** (Custom) Likely related to inverting or extracting information from an image with advanced controls.
## Mastering Prompts for FluxCraft Unlimited
Prompting in FluxCraft Unlimited is a dynamic process that adapts to the model and tool you choose. While some models excel with simple descriptions, others unlock their full potential with detailed, structured prompts and the integration of visual references.
### General Prompting Principles:
Whether generating from scratch or editing, clear and detailed prompts yield better results. Describe subjects, actions, settings, styles, and mood.
Your prompt's interpretation is heavily influenced by the selected tool. A prompt for "Generate" will be interpreted differently than the same prompt used with "Fill" or "Redux".
Flux models generally respond well to natural language sentences rather than just keywords.
While not all models fully support them, using negative prompts can help steer the AI away from unwanted elements or artifacts.
### Prompting for Specific Tools/Features:
Focus on describing the desired final image. Include details about composition, lighting, style, and subject matter.
*Example:* "A cinematic shot of a lone astronaut standing on a rocky alien planet under two moons, wide angle, dramatic lighting."
Describe the desired changes or the new style you want to apply to the input image.
*Example:* (Input: Photo of a dog) Prompt: "Turn this dog into a cyberpunk robot, neon lights, wires, futuristic."
Describe the desired output image, and the AI will use the input image as a strong visual guide for composition, color, or style, depending on the model and strength settings.
*Example:* (Input: A sketch of a character) Prompt: "Render this sketch as a detailed fantasy oil painting."
Describe what you want to appear in the masked area. The AI will attempt to generate content that fits the prompt and blends with the unmasked parts of the image.
*Example:* (Mask over a blank wall) Prompt: "Add a vibrant mural of a dragon breathing fire."
Include the LoRA's specific **trigger word** in your prompt. Then, describe the scene or subject you want, incorporating the concept or style the LoRA was trained on.
*Example:* (Using a "fantasy creature" LoRA with trigger "mythicbeast") Prompt: "A majestic **mythicbeast** perched on a cliff overlooking a misty valley."
Your prompt describes the *content* and *style* of the image, while the ControlNet image provides the *structure* or *composition*. Ensure your prompt aligns with the structural guide provided by the ControlNet image.
*Example:* (ControlNet: Canny edges of a building) Prompt: "A beautiful watercolor painting of an ancient castle at sunset." (The AI will generate a watercolor painting of a castle following the edge structure of your input image).
Describe the desired image, indicating how the AI should draw inspiration from the reference image(s). You can reference specific images if using multiple.
*Example:* (Reference Image 1: A character, Reference Image 2: A scene) Prompt: "Generate a portrait of the person from image1 standing in the setting from image2."
### Prompt Examples
Here are some examples showcasing prompting for different scenarios:
A sprawling futuristic city at night, illuminated by neon lights and flying vehicles. High angle view, digital painting, vibrant colors, moody atmosphere.
(Input Image: Photo of a cat) Prompt: "Turn this photo into a stained glass window, vibrant colors, intricate patterns, glowing light."
(Input Image: Room with empty table, Mask over table) Prompt: "Place a steaming cup of coffee and a book on the table."
(Using LoRA with trigger "cyberart") Prompt: "A portrait of a woman in the rain, **cyberart**, neon reflections, detailed face, moody lighting."
(ControlNet Input: Pose of a person) Prompt: "An ancient warrior in battle armor, dynamic pose, fantasy art style, epic lighting."
(Reference 1: Character A, Reference 2: Scene B) Prompt: "Character from image1 exploring the landscape from image2, cinematic lighting, adventurous mood."
## How to Use FluxCraft Unlimited
Embark on your creative journey with this general workflow:
Choose the Flux model that best suits your needs based on its available tools and characteristics (Schnell, Dev, Pro, Ultra, Realism, Custom, Subject).
Choose the specific tool you want to use from the options available for your selected model (e.g., Generate, Redux, Fill, Image to Image).
Enter your text description for the image you want to create or modify. Include trigger words if using LoRAs.
If your selected tool or model requires visual input (Redux, Image to Image, Fill, Inpainting, Custom model with References/ControlNets, Subject model), upload the necessary image(s) or ControlNet files. Draw a mask if using Fill or Inpainting.
Configure common settings like Image Size, Inference Steps, Guidance Scale, and Seed. Adjust model-specific options like LoRA/ControlNet settings, Reference Strength, RF-Inversion controls, or the Ultra model's Raw option.
Click the "Generate" button and await your creation.
Examine the generated image. Iterate by adjusting prompts, settings, or inputs if needed.
## Input Parameters and Options
FluxCraft Unlimited offers a wide array of input parameters to give you precise control over the image generation and modification process. The available parameters vary depending on the selected **Model** and **Tool**.
### Common Parameters (Available across multiple Models/Tools):
Your text description guiding the image creation or modification.
A text prompt specifying elements, styles, or characteristics to avoid in the generated or modified image.
The desired dimensions or aspect ratio for the output image. Can be selected from presets (e.g., `square_hd`, `landscape_16_9`) or specified with custom `width` and `height`. Specific options vary by model.
Controls the detail and refinement of the image generation/modification process. Higher values generally result in more detailed outputs but may increase processing time. (Range typically 3-50).
A number that initializes the random generation process. Using the same seed with the same prompt and settings will produce a consistent result. Enter `-1` or leave empty for a random seed.
Adjusts how closely the AI adheres to your text prompt. Higher values result in outputs that stick more strictly to the prompt, while lower values allow for more creative variation. (Range typically 1-20).
The number of images to generate in a single batch.
The file format for the generated image.
Possible enum values: `png`, `jpeg`
### Model-Specific Parameters:
*Applies to:* **Pro 1.**, **Custom**
A list of LoRA models to apply to the generation.
The URL or ID of the LoRA model.
Controls the strength of the LoRA's influence on the image. (Range typically 0-2).
The specific word or phrase that activates the LoRA's effect in the prompt. (Required when using the LoRA).
The ID of a finetuned version of the LoRA. (Used with finetuned endpoints).
Controls the strength of the finetuned LoRA's influence. (Range typically 0-2).
*Applies to:* **Pro 1.**, **Ultra 1.1** (when using finetuned endpoints)
The ID of the specific finetuned model version to use.
Controls the overall strength of the finetuned model's influence. (Range typically 0-2).
*Applies to:* **Custom**
A list of ControlNet models to apply for structural guidance.
The URL or ID of the ControlNet model.
The configuration URL for the ControlNet model.
The variant of the ControlNet model.
The URL of the image providing structural guidance (e.g., Canny edges, depth map).
The URL of a mask image to apply the ControlNet effect only to masked areas.
Threshold for the mask image. (Range typically 0-1).
Controls the strength of the ControlNet's influence. (Range typically 0-2).
*Applies to:* **Custom**
The URL of a reference image to influence the visual style or content.
Controls the strength of the reference image's influence. (Range typically 0-1).
*Applies to:* **Ultra 1.1**
Toggle for enhanced style consistency.
*Applies to:* **Subject**
The URL of the primary image of the subject for generation.
### Tool-Specific Parameters:
*Applies to:* **Schnell 1.**, **Dev 1.**, **Pro 1.**, **Pro 1.1**, **Ultra 1.1**
The URL of the image to be remixed or modified.
*Applies to:* **Ultra 1.1** Redux
Controls how much the original image influences the result when remixing. (Range typically 0-1).
*Applies to:* **Dev 1.**, **Custom**
The URL of the input image to be transformed.
Controls the strength of the transformation from the original image. (Range typically 0-1).
*Applies to:* **Pro 1.**, **Custom**
The URL of the base image for filling or inpainting.
The URL of the mask image defining the area to be filled or inpainted.
*Applies to:* **Custom** Inpainting
Controls the strength of the inpainting process. (Range typically 0-1).
*Applies to:* **Custom**
The URL of the base image.
The URL of the image defining the desired changes or areas.
Controls the strength of the differential diffusion effect. (Range typically 0-1).
*Applies to:* **Custom**
The URL of the image for RF-Inversion.
Controls the forward pass of the controller. (Range typically 0-1).
Controls the guidance of the controller. (Range typically 0-1).
Start point for reverse guidance. (Range typically 0-1).
End point for reverse guidance. (Range typically 0-1).
Schedule for reverse guidance.
Possible enum values: `constant`, `linear_increase`, `linear_decrease`
*Applies to:* **Pro 1.**
The URL of the image providing the Canny edge or Depth map for guidance.
## How to Use FluxCraft Unlimited
Embark on your creative journey with this general workflow:
Choose the Flux model that best suits your needs based on its available tools and characteristics (Schnell, Dev, Pro, Ultra, Realism, Custom, Subject).
Choose the specific tool you want to use from the options available for your selected model (e.g., Generate, Redux, Fill, Image to Image).
Enter your text description for the image you want to create or modify. Include trigger words if using LoRAs.
If your selected tool or model requires visual input (Redux, Image to Image, Fill, Inpainting, Custom model with References/ControlNets, Subject model), upload the necessary image(s) or ControlNet files. Draw a mask if using Fill or Inpainting.
Configure common settings like Image Size, Inference Steps, Guidance Scale, and Seed. Adjust model-specific options like LoRA/ControlNet settings, Reference Strength, RF-Inversion controls, or the Ultra model's Raw option.
Click the "Generate" button and await your creation.
Examine the generated image. Iterate by adjusting prompts, settings, or inputs if needed.
## Tips for Best Results
Each model and tool combination offers unique capabilities. Experiment to find the best fit for different types of images or tasks.
Invest time in crafting detailed and precise prompts, especially when combining text with visual inputs like LoRAs, ControlNets, or References.
Don't shy away from adjusting the various settings and exploring LoRAs/ControlNets to achieve highly tailored results.
Generate multiple versions with slight variations in settings or prompts to find the optimal outcome.
## Conclusion
FluxCraft Unlimited offers an unparalleled AI image generation experience, providing creators with a powerful array of models, tools, and customization options. Whether you're seeking speed, precision, or the ability to blend complex visual concepts, FluxCraft Unlimited empowers you to push the boundaries of your creative potential.
***